Intro
To those who develop in java nowadays, it’s almost impossible to miss Spring framework and more specifically Spring Boot. Using this development stack, we gain more productivity and agility from small to large sized java projects. In this guide I’ll demonstrate how to install, configure eclipse and create a simple Hello-World using java, eclipse and spring boot.
The github repository of the example project of this post, can be found at: https://github.com/danielpadua/java-spring-eclipse-example
Requirements
- Java JDK 8 or higher
Installing Eclipse
It’s also worth to mention that installing Spring Tool Suite (STS) instead of pure eclipse, is highly valid. STS is basically eclipse configured with spring tools plugin, optimized for spring framework development
Use the following sections based in which operational system you’ll be using:
Windows
In Windows we have 2 options:
Direct download
Go to eclipse download page, select the latest version (on the writing date of this guide is the 4.10 and install it using NNF (next, next and finish).
Using a package manager (Chocolatey)
If you don’t know Chocolatey, take a look at this post.
Open powershell and install eclipse using the following command line:
1
  choco install eclipse
Linux
In Linux we also have 2 options:
Direct download
Go to eclipse download page, select the latest version (on the writing date of this guide is the 4.10, extract the .tar.gz file and execute the eclipse file.
Using a package manager
Depending in which Linux distro you are using, you’ll use a different package manager. For instance, debian based distros, like the popular ubuntu, use apt-get. For Red Hat (or RHEL) based distros use yum or dnf. Search the best way to install eclipse using your package manager.
macOS
In macOS we have 2 options again:
Direct download
Go to eclipse download page, select the latest version (on the writing date of this guide is the 4.10 and install it as usual, dragging the app from the .dmg file to the apps folder of your mac.
Using a package manager (Homebrew)
If you don’t know Homebrew, take a look at this post
Open your favorite terminal and install eclipse using the following command line:
1
brew cask install eclipse-ide
Configuring eclipse
With eclipse installed, I suggest you to open it and start getting used with the GUI and also the shortcut keys.
If you installed Spring Tool Suite, it’s not necessary to follow the installation of Spring Tools below
Spring Tools
In order to have a better development experience with Spring, I recommend you to install the eclipse plugin: Spring Tools. Go to menu Help > Eclipse Marketplace… and search for spring:
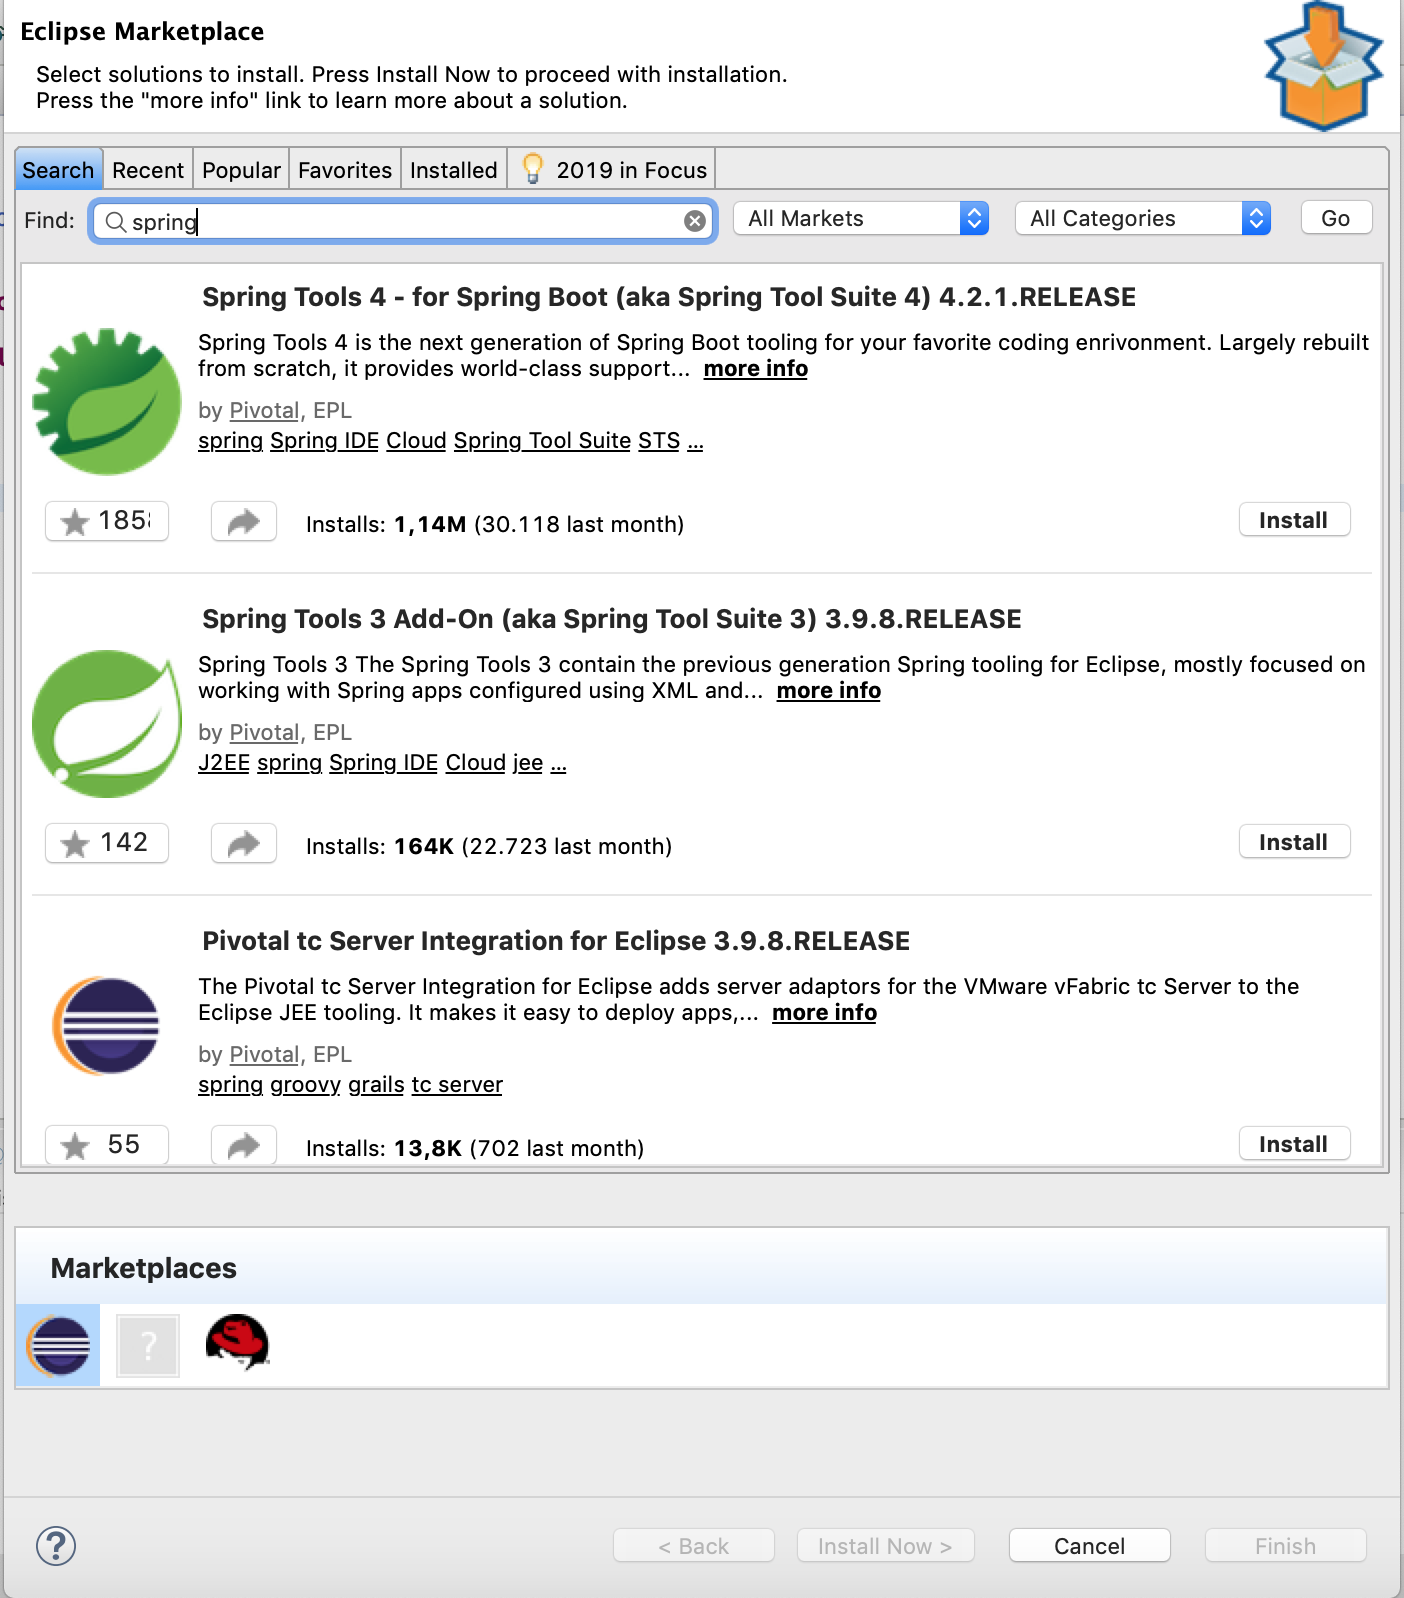 Installing Spring Tools
Install the latest version of Spring Tools (on the writing date of this guide it is the 4.2.1) and restart eclipse.
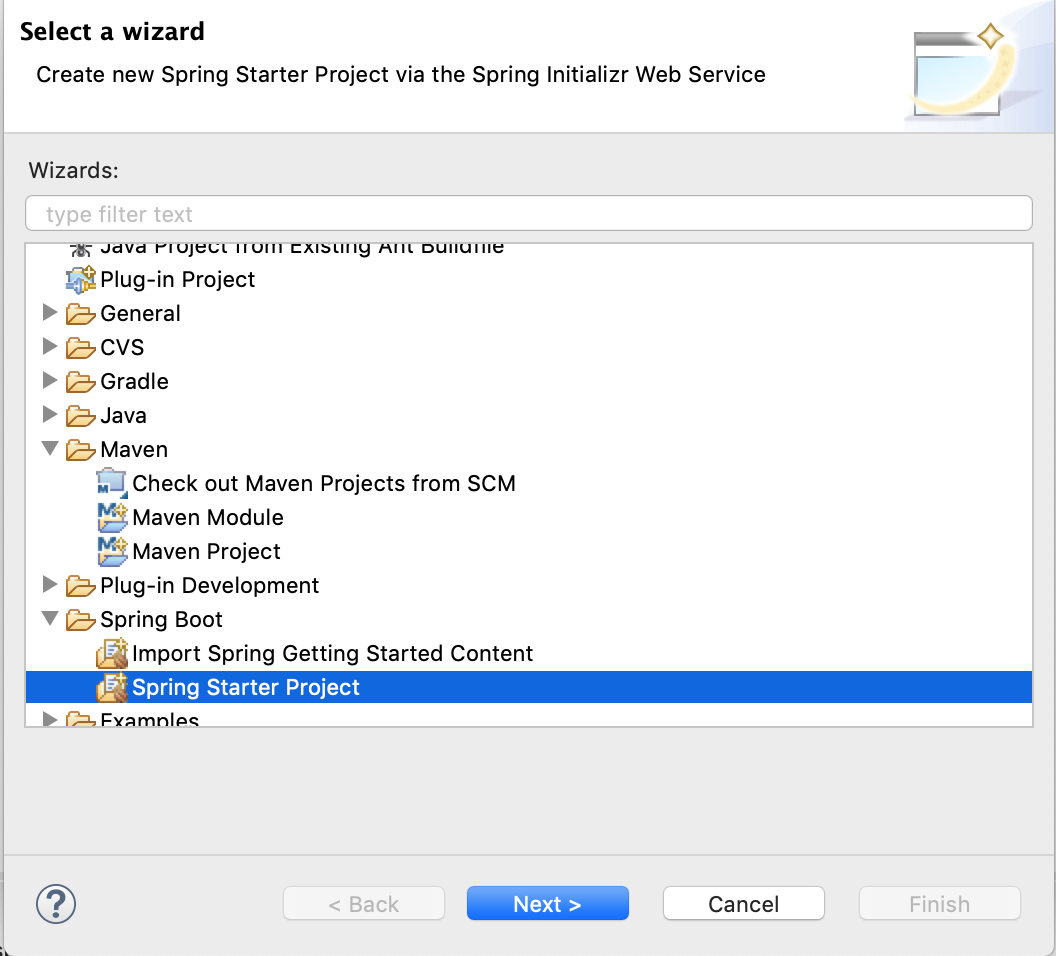
Creating the project
With everything correctly configured, it’s time to create our project. Go to menu: File > New > Project… and select the option Spring starter Project which is located below Spring Boot menu, as the following image:
 Starting the project
For this example, I’ll be using Maven as build-tool.
Fill the fields with the name of your artifact and groupId, and select the Type field as Maven:
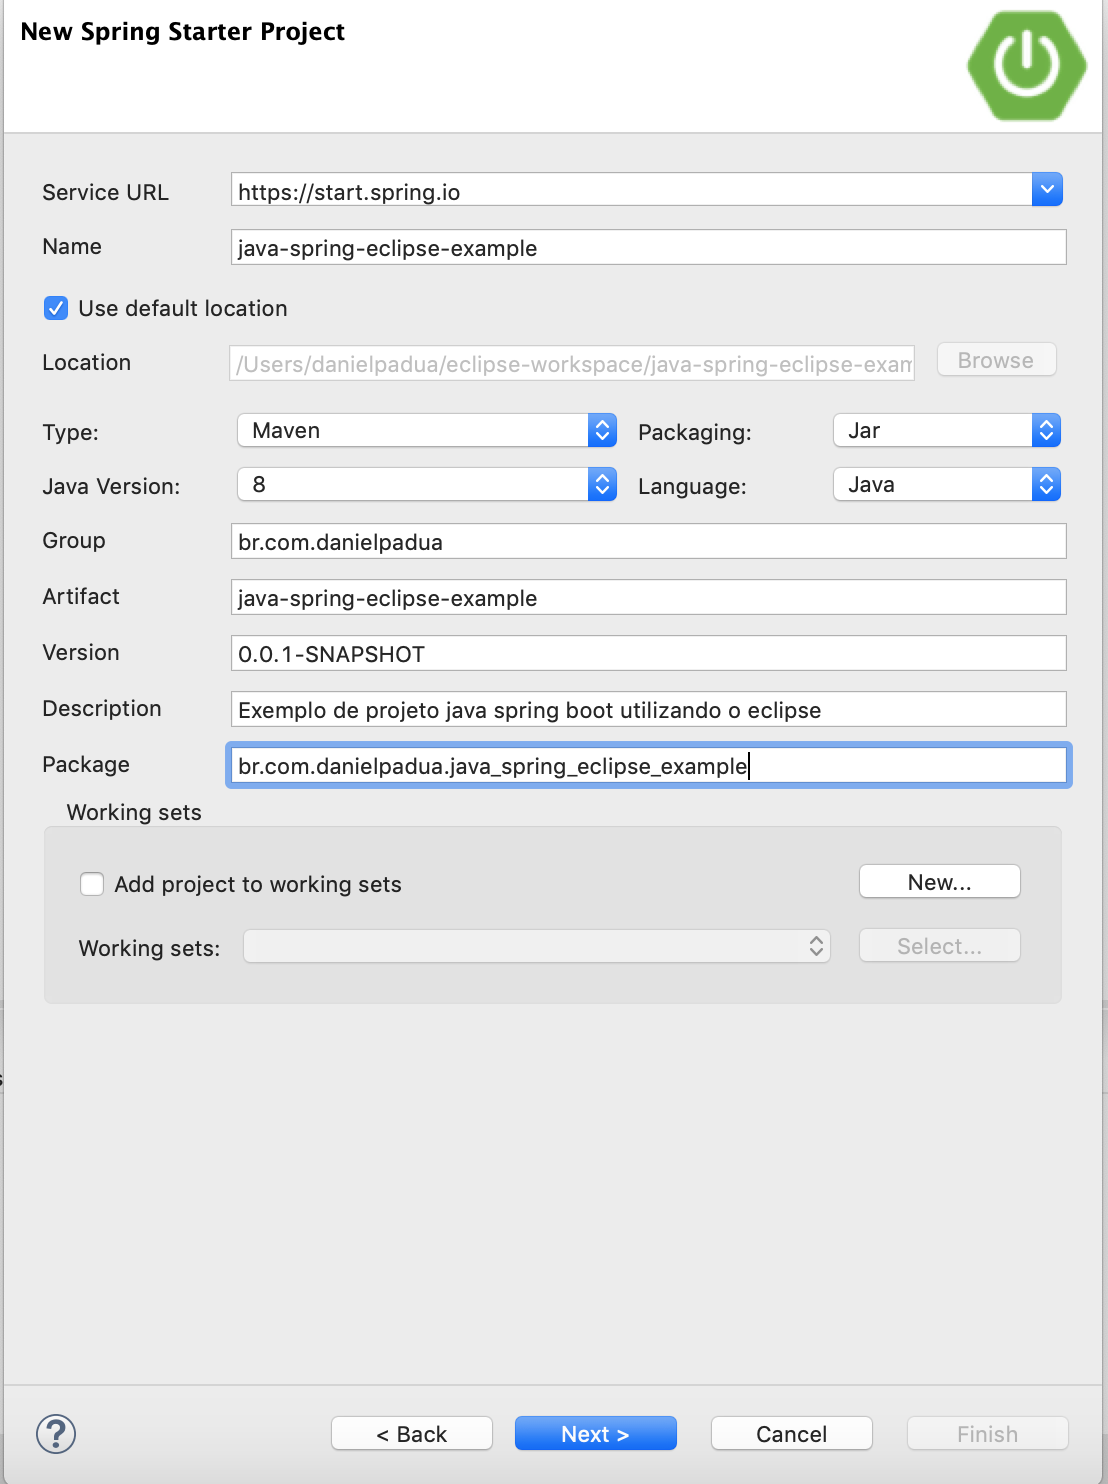 Starting the project using Maven
After clicking next, we’ll have to especify which version of Spring we will be using. Select the latest stable version (on the writing date of this guide it’s the 2.1.4). As dependency, only select the Web and click Finish.
 Select Spring version and dependencies
Project created, now it’s time to create a Controller with a endpoint that will return a fixed String with the value: “Hello-World”. Right click the main package and select New > Class:
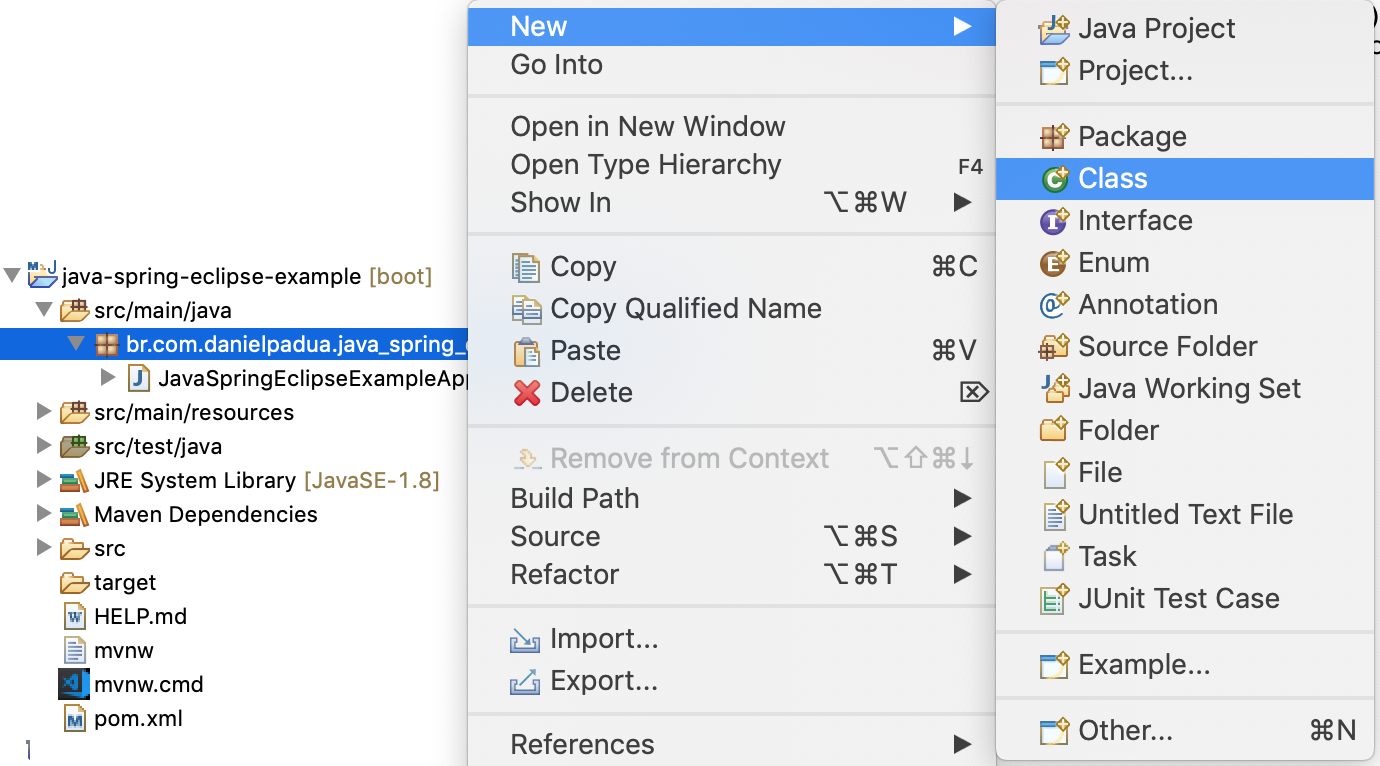 Creating a class
And create a class named “ExampleController” and fill the suffix of the package with “.controllers”, so a package named controllers will be created and nest your class, and it will group other controllers:
 Creating ExampleController
Use the code below to create the endpoint that will return “Hello-World!”:
1
2
3
4
5
6
7
8
9
10
11
12
13
14
15
16
17
18
19
20
21
22
package br.com.danielpadua.java_spring_eclipse_example.controllers;

import org.springframework.http.ResponseEntity;
import org.springframework.web.bind.annotation.GetMapping;
import org.springframework.web.bind.annotation.RequestMapping;
import org.springframework.web.bind.annotation.RestController;

/**
 * ExampleController
 *
 * @author danielpadua
 *
 */
@RestController
@RequestMapping("/api/example")
public class ExampleController {

	@GetMapping("/hello-world")
	public ResponseEntity<String> get() {
		return ResponseEntity.ok("Hello World!");
	}
}
Run the project by clicking the button Boot Dashboard and then the tab Boot Dashboard at the bottom of the screen. Select the name of your project and click the run button:
 Running the project
After clicking run button, you will see the output log of spring initialisation in console tab:
 Spring initialization log
To test the project, you only have to open your favorite browser and access: http://localhost:8080/api/example/hello-world and you should be seeing the Hello World message:
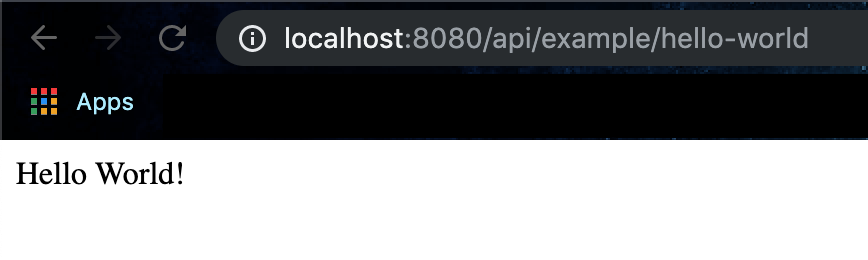 Voilà
Voilà
Conclusion
Eclipse and Spring Tool Suite (STS) are greate IDEs for developing robust java and spring based applications, and due to the stability of the tool, it ends up being super easy the ‘start’ of a simple project.
See you soon!